Showing posts with label Breads. Show all posts

Sunday, September 2, 2012

A Bit of Texas Pride


Mmmm....  Texas Style food is the BEST!  There's nothing better than waking up to a pan full of flaky biscuits, warm and fresh out of the oven.  I'll bet you think they are lots of work to whip up, but I promise you they are easier to make than Grandma's were! 

Follow me, and I'll lead you to a recipe that will make your family happy, fill your freezer, and give you a taste of old-fashioned Texas pride!!!

Before we get to that amazing biscuit recipe, I want to share another bit of Texas Pride:  Texas Style Barbeque!!  Is there anything better in life than a slice of tender smoked brisket or a rack of savory baby back ribs?  And doesn't the thought of a pan full of peach cobbler or pecan pie cobbler just make your knees week?


Let me share a bit of the Texas lifestyle with you.  There's an old BBQ joint located in Adkins, Texas, just outside of San Antonio.  The place is called Texas Pride.  How can you get any prouder to live here than to name your restaraunt "Texas Pride"??  One of the many reasons that I love living here in this state, a place that I've called home my entire life, and a place that generations of my family have called home, is that we have so much pride in who we are. 


The feel of going back in time hits you as soon as you pull into the parking lot.  When was the last time you were greeted by a parking attendant on horseback? 


Walking up to the restaraunt, you begin to feel that you have gone back in time to the old towns of times gone past. 


I remember riding one of these at the grocery store when I was a little girl.  I'll bet you have the same kind of memories!


Once you enter the building, the awesome aroma of wood smoke and meat just fills the air.  Right away your stomach starts to grumble!  (I don't know who this guy is who ended up in my photo!)


This sign just cracked me up.  And for you who don't live in Texas, Big Red is the most amazing soda ever.  It's fizzy, red, unmatchable deliciousness!!!


Here's one of our trays with some of our goodies:  Baby Back Ribs and Pit Smoked Brisket (in the wrappers), mac-n-cheese, cole slaw, beans, and peach cobbler.  Our other tray had more ribs and brisket, cheezy potatoes, green beans, and pecan cobbler.  YUMMM!!!


Holy Cow! 
While there was a concert in their music venue, we had such full tummies, so we decided to share a dance out in the parking lot under the Texas stars and the full moon, then ride off into the South Texas sunset.
  
***************************************************************************
 Now that your tummies are grumbling for some South Texas grub, here's a recipe for you!
Waking up Sunday morning, we still had that feel of old-time Texas in our hearts.  There's no better way to satisfy our nostalgic feelings than to bake up some super easy Homemade Biscuits ~ Texas Style.  Did I tell you that these wonderful old-fashioned biscuits are FREEZABLE!??  Make some on Sunday morning, and have biscuits for the rest of the week.  No cans of biscuits in The Menu Maker Mom's kitchen today!  No strange chemicals either!
Ingredients:
6 cups all-purpose flour
3 Tbsp. baking powder
1 tsp. salt
2 sticks butter, very soft
2 cups plain Greek yogurt
Enough milk to thin the yogurt until it's the consistency of buttermilk
In a very large bowl, mix the flour, baking powder, and salt.  Using two forks or a pastry blender, blend in the butter until you can't see any big chunks any larger than a tiny pea.  I have also done this in my Kitchenaide mixer, using the whisk attachment.
Mix up your yogurt and milk in a small bowl.
Add the thinned yogurt to the flour and mix with your hands or a wooden spoon. 
Turn the whole mess out onto a surface covered with another 1/4 cup of flour.  Knead the dough only about 10 times.  It will feel quite wet, not at all like pizza dough or bread dough.
Pat the dough out until it's 1" thick.  Cut out your biscuits with a biscuit cutter, clean can, or glass that is about 2-1/2" in diameter.  Just press the cutter straight down, don't swivel it around to cut the biscuits.  Straight cuts make higher rising biscuits!
Bake your biscuits at 400 degrees farenheit for about 10-15 minutes or until golden brown. 
Flash freeze any extras, then transfer to a plastic freeezer bag, and pop them into your freezer.  Place frozen biscuits on a cookie sheet, bake at 425 for about 15 minutes for fresh homemade biscuits any time!
Makes 24 2-1/2" biscuits.
Wanna bite?

Sunday, August 5, 2012

Mama's Pizza Kitchen


Mmmm….  Can you smell that?  Welcome to Mama's Pizza Kitchen.   I wish the internet had smell-a-vision because this kitchen smells absolutely scrumptious!! 
It’s Saturday night, Pizza Night around here.  The flavorful aroma of cheesy pepperoni pizza just fills the air.  Everyone’s tummy is grumbling, and kids are repeatedly crying out, "Is it ready yet?"   A movie is ready to be played, the sodas are chilling in the fridge, and the obligatory salad has been made.

I say obligatory, because every good Mama should have fresh veggies prepped for the meal…  but we all know that when there’s fresh homemade pizza coming out of the oven, the salad might just go untouched.  Consider it great planning to have tomorrow’s salad already made!  Yeah, that’s right…  Act like you planned it that way!

Making the pizza dough isn’t very hard at all.  I haven’t purchased a premade pizza crust in years, because these are just so easy to make.  You can even freeze the dough if you parbake it for 10 minutes or so, cool it, then wrap it well. 

Don’t let all the steps in this tutorial scare you.  I really broke it down, so you could get a good look at the whole process.

If you don’t have a mixer, then mix it up by hand.  It will only take you a few minutes longer, and you can get an arm work out too!!!

As for the toppings, do what you like.  Anchovies, pineapple, ham, sliced tomatoes, cheddar cheese, taco meat, jalapenos…  the sky’s the limit here!
Are you ready to make some pie?   If the answer is yes, then gather the following ingredients:
Ingredient List

3-1/2 Cups flour
2 teaspoons yeast or 1 packet yeast
2 teaspoons olive oil
1/2 teaspoon salt
1 cup water

STEP #1:  Dissolve the yeast in warm water

 Dissolve the yeast in 1 cup of WARM water.
You can do this in a cup or in your mixing bowl.
If you dissolve the yeast in warm water in a cup,
transfer it to your mixing bowl when you are done.

You can see that the yeast it completely dissolved.  It's even a bit bubbly after mixing and sitting for a bit.

STEP 2: Add the rest of the ingredients
Add 2 cups flour, 1/2 teaspoon salt, and 2 teaspoons olive oil to the bowl.
We're ready to start mixing now....
READY
SET
GO!!!!!

STEP 3: Mix the dough (Make a mess)

On medium speed, mix until the dough is pulling from the side of the bowl.
Did you read that little post script on the photo?  It says, "P.S.  You are going to make a mess.  It's okay."
And if you're doing this by hand in a large bowl, you can read that out loud twice.  And smile while you're doing it.
Don't forget...  the kids can clean this up.  What did we have them for anyway???
STEP 4:  Add flour and knead your dough

Mix that dough up, then when you see it pulling away from the side of the bowl, it's time to start adding flour.

Add 1/2 cup of flour, then mix.  Then start adding flour 1/4 cup at a time until a ball forms.  When you have a nice ball that isn't sticky, STOP adding flour. 

Kneed your dough in your mixer for 2 minutes. Your dough should be soft like Play Dough.  Don't make it stiff.

If you're not using a stand mixer, it's time to roll up your sleeves and get a work out!  Knead your dough by hand for 5 minutes.
STEP 5: Roll the dough into a ball

When you are done kneading your dough in the mixer or in a bowl, take it out and form a large ball.
Pretty, isn't it?  
STEP 6: Grease your bowl

It's just about time to put our little dough ball down for a nap, but first we need to give the bowl a quick spray with non-stick cooking spray.  You can oil it with some olive oil instead if you like.  Just make sure the bowl has been greased so the dough doesn't stick.
STEP 7: Put the dough in a greased bowl and cover

Put the dough ball in the bowl and say goodnight!

Cover your dough with plastic wrap or a plate.  The goal is to keep the air out.  We want our dough to stay slightly warm and we don't want air to dry it out.

STEP 8: 
Oops....  looks like miscounted my photos!!!  Go on to #9.  Don't tell anyone that I'm not perfect.

STEP 9: Get the dough out of the bowl

After about an hour,  your dough should be much larger, smooth, and puffy looking.  It smells good too!

Take it out of the bowl and place it on a floured surface.  I use a roulpat, which is a flexible rolling mat.  That keeps my counter clean.
You can leave your dough ball all intact so a large pizza can be made, or you can cut it into smaller chunks of dough. 
As you can see, we are having individual personal pizzas tonight!
STEP 10: Sprinkle cornmeal in a pan

Whether you are using a pizza stone or a cookie sheet, if you sprinkle some cornmeal on the pan, your pizza won't stick.  The dough sort of rides on top of the cornmeal. 
Don't forget to do this part!

STEP 11: Roll it out

Roll out the dough on your floured surface and transfer to your pan!
The traditional way to prepare pizza dough is to pat it out, and the fun way to do it is to throw it up in the air... but I like to roll it. 
I've tried throwing it, but ended up tossing it to the floor.  The 10-second rule does not apply to dough landing on the floor.  You pretty much have to chunk it and call Dominos.
STEP 12:  Add your toppings!

This is where the real creativity begins.  We have pizza sauce, cheese, pepperoni, freshly sauteed mushrooms, cooked sausage, green bell pepper, freshly grated parmesan cheese, sliced onions, sliced olives.

Put your favorites on your pizza.  Go crazy! 
 Load it up and try new stuff.  Be wild and have fun!


STEP 13:  Bake and serve!

That's it!  Although I broke it into a lot of tiny steps, it really is super easy and you'll never want a store-bought pizza again.  Have a blast making pizza memories with your family!
Peace to you all,

The Menu Maker Mom

Feeding the family ~ One menu at a time


Tuesday, June 29, 2010

Kitchen Tip Tuesday: CROUTONS!

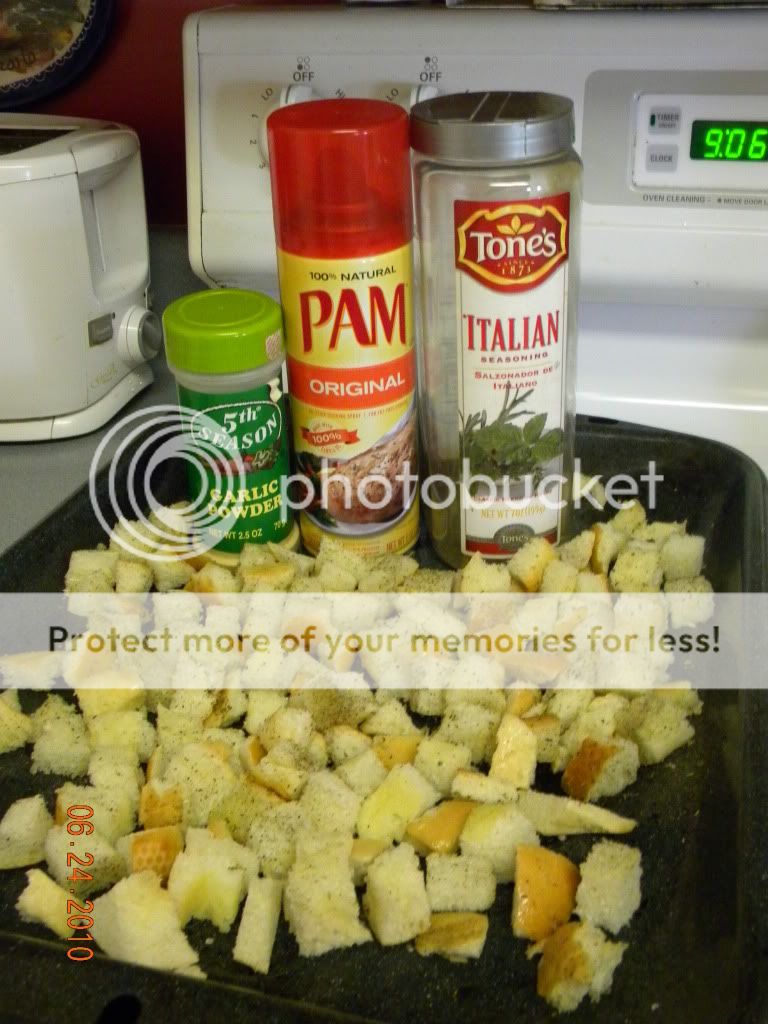
Don't you just love croutons?  I mean really, what's a garden salad without those little crunchy squares of flavored bread?  Luckily for me I almost always have a stash.  After all, there's always a couple of slices of left over bread or rolls to be dealt with.  With these little bits of bread, my freezer stays stocked with bread crumbs and croutons!

Here's last night's leftover sliced and buttered bread.  It sure was good!  Now, it just sits and waits to be forgotten and thrown away.  But not in this house!  I'll give it a second life as crunchy croutons.


This is so simple!  Just cut the bread into small 1/2" squares.  Spray the bread cubes liberally with non-stick spray and sprinkle with your favorite seasonings.  I used garlic salt and italian seasoning.  Mix the bread cubes with your hands to distribute the spices.  Spray some more and sprinkle some more, if you need to. 

Spread the bread cubes evenly on a cookie sheet, broiler pan, or any other flat pan that can go into the oven.  Set the oven temp at 250 degrees F.  Bake for about half an hour to 45 minutes.  Basically bake until the bread cubes looks like croutons!


Cool your croutons before storing them in a tightly sealed container.  I store mine in the freezer, just to be safe.  Can't wait to add them to my salads this week!

~~~~~~~~~~~~~~~~~~~~~~

Menu Maker Mom ~
Makin' Yummies... Stuffin' Tummies

Thursday, June 24, 2010

BEES!!!!


Take a look at that!!!  Do you know what it is?  BEES!!!!  Millions of them!!  And guess where they were?  On a branch of a tree in my front yard, right next to my driveway... where I had just parked my car!!!  Yes ~ They were right next to my car which held 3 noisy teenage girls, who poured out the doors, laughing, yelling, slamming those doors, and running.  YIKES!!!

The bees formed a dripping ball around the branch.  I'm assuming they were surrounding their queen.  They were calm and didn't to fly about much.  I prayed that if they decided to swarm about that they were not the aggressive type.  My mother-in-law had some bees chase her a couple of years ago.  She was mowing the lawn with the riding lawn mower, and the vibration must have aggravated some nearby bees.  As they began to swarm her, she hopped off the mower and ran toward the house.  All the while, the bees continued to chase her and swarm around her head.

She ran through the house toward the bathroom, still being chased.  A few bees still swarmed around her head as she ran.  After she dropped to the carpet and began to roll, the last remaining bees flew off.  My mother-in-law stood up shaken and stung.

As I looked at our buzzing, branch hugging bees, the thought of them possibly deciding to chase me gave me the chills, so I quickly went back into my house after snapping this photo!

After about an hour, I went back outside to take another look at our buzzing bees.  They were gone.  I guess our tree was just a rest stop for them as they travelled to their final destination.  Wherever they ended up, I hope the honey was good!

In honor of our flying guests, I offer my favorite bread recipe.  I make my bread in a automatic bread maker, and it makes my whole house smell so yummy.  Once done, it doesn't last long around here, as my hubby and daughters quicly slice the warm, yeasty bread and slather it with real butter and local, organic honey.  YUMMM!!!

~~~~~~~~~~~~~~~~~~~~~~~~~~

HONEY WHEAT BREAD

1 pkg. yeast
3/4 cup whole wheat flour
2-1/2 cups bread flour
1 tsp. salt
2 Tbsp. honey
2 Tbsp. butter
1 egg (room temperature)
1 cup plus 1 Tbsp. warm water

Put dry ingredients into automatic bread maker.  Mix wet ingredients in a small bowl.  Make a well in the dry ingredients and pour in the wet mix.  Bake the bread on the Whole Wheat setting of your bread maker.

Serve with butter and honey!

~~~~~~~~~~~~~~~~~~~~~~~~~~~~

If you enjoy making this bread, you might consider getting several Zip-Lock baggies and filling each with the measured out dry ingredients.   You can be making bread every few days, if you like, and your family will once again give you the MAMA!!!  (Don't forget ~ that means Most Awesome Mother Award!!!)

There are lots of bread makers on the market, and you can spend a little or a lot.  Here are a couple of examples:

SO YUMMY!!!! 
And Soooo  M-M-M Good!!!

~~~~~~~~~~~~~~~~~~~~~~~~~~~~~~

Menu Maker Mom
Makin' Yummies...  Stuffin' Tummies