Showing posts with label Make it from Scratch. Show all posts

Sunday, September 2, 2012

A Bit of Texas Pride


Mmmm....  Texas Style food is the BEST!  There's nothing better than waking up to a pan full of flaky biscuits, warm and fresh out of the oven.  I'll bet you think they are lots of work to whip up, but I promise you they are easier to make than Grandma's were! 

Follow me, and I'll lead you to a recipe that will make your family happy, fill your freezer, and give you a taste of old-fashioned Texas pride!!!

Before we get to that amazing biscuit recipe, I want to share another bit of Texas Pride:  Texas Style Barbeque!!  Is there anything better in life than a slice of tender smoked brisket or a rack of savory baby back ribs?  And doesn't the thought of a pan full of peach cobbler or pecan pie cobbler just make your knees week?


Let me share a bit of the Texas lifestyle with you.  There's an old BBQ joint located in Adkins, Texas, just outside of San Antonio.  The place is called Texas Pride.  How can you get any prouder to live here than to name your restaraunt "Texas Pride"??  One of the many reasons that I love living here in this state, a place that I've called home my entire life, and a place that generations of my family have called home, is that we have so much pride in who we are. 


The feel of going back in time hits you as soon as you pull into the parking lot.  When was the last time you were greeted by a parking attendant on horseback? 


Walking up to the restaraunt, you begin to feel that you have gone back in time to the old towns of times gone past. 


I remember riding one of these at the grocery store when I was a little girl.  I'll bet you have the same kind of memories!


Once you enter the building, the awesome aroma of wood smoke and meat just fills the air.  Right away your stomach starts to grumble!  (I don't know who this guy is who ended up in my photo!)


This sign just cracked me up.  And for you who don't live in Texas, Big Red is the most amazing soda ever.  It's fizzy, red, unmatchable deliciousness!!!


Here's one of our trays with some of our goodies:  Baby Back Ribs and Pit Smoked Brisket (in the wrappers), mac-n-cheese, cole slaw, beans, and peach cobbler.  Our other tray had more ribs and brisket, cheezy potatoes, green beans, and pecan cobbler.  YUMMM!!!


Holy Cow! 
While there was a concert in their music venue, we had such full tummies, so we decided to share a dance out in the parking lot under the Texas stars and the full moon, then ride off into the South Texas sunset.
  
***************************************************************************
 Now that your tummies are grumbling for some South Texas grub, here's a recipe for you!
Waking up Sunday morning, we still had that feel of old-time Texas in our hearts.  There's no better way to satisfy our nostalgic feelings than to bake up some super easy Homemade Biscuits ~ Texas Style.  Did I tell you that these wonderful old-fashioned biscuits are FREEZABLE!??  Make some on Sunday morning, and have biscuits for the rest of the week.  No cans of biscuits in The Menu Maker Mom's kitchen today!  No strange chemicals either!
Ingredients:
6 cups all-purpose flour
3 Tbsp. baking powder
1 tsp. salt
2 sticks butter, very soft
2 cups plain Greek yogurt
Enough milk to thin the yogurt until it's the consistency of buttermilk
In a very large bowl, mix the flour, baking powder, and salt.  Using two forks or a pastry blender, blend in the butter until you can't see any big chunks any larger than a tiny pea.  I have also done this in my Kitchenaide mixer, using the whisk attachment.
Mix up your yogurt and milk in a small bowl.
Add the thinned yogurt to the flour and mix with your hands or a wooden spoon. 
Turn the whole mess out onto a surface covered with another 1/4 cup of flour.  Knead the dough only about 10 times.  It will feel quite wet, not at all like pizza dough or bread dough.
Pat the dough out until it's 1" thick.  Cut out your biscuits with a biscuit cutter, clean can, or glass that is about 2-1/2" in diameter.  Just press the cutter straight down, don't swivel it around to cut the biscuits.  Straight cuts make higher rising biscuits!
Bake your biscuits at 400 degrees farenheit for about 10-15 minutes or until golden brown. 
Flash freeze any extras, then transfer to a plastic freeezer bag, and pop them into your freezer.  Place frozen biscuits on a cookie sheet, bake at 425 for about 15 minutes for fresh homemade biscuits any time!
Makes 24 2-1/2" biscuits.
Wanna bite?

Thursday, August 2, 2012

Missie's Cake-In-A-Mug Recipe

Menu Maker Mom Twin, Missie, loves to cook.  She especially loves to make cakes-in-a-cup.  Cakes -in-a-cup are so great for kids with a sweet tooth (which ones don't have a sweet tooth 24 hours a day???), for college students, or for anyone who likes to have a bite of cake now and then without breaking out the cake pans.  You can also add your own flavors.  We love to add a packet of instant coffee, or a quarter teaspoon of rum extract, a few tablespoons of chocolate chips, some nuts, or even a couple tablespoons of mashed banana or raspberries.... Be creative!!!

Here are a couple of her FAVE recipes:

Chocolate Cake:
4 tablespoons all purpose flour
4 tablespoons sugar
2 tablespoons baking cocoa
1 teaspoon chocolate pudding mix
1 egg (or 1/4 cup egg beaters)
3 tablespoons milk 3 tablespoons oil (or applesauce)
1/2 tsp. vanilla 

1.  Greast a large coffee cup by using non-stick cooking spray or butter.
2.  Put the dry ingredients in a ceramic mug,  mixing well with a fork.
3.  Pour in the milk, vanilla and oil, and mix well.
4.  Add the egg and mix thoroughly.
5.  Add the chocolate chips (if using) and mix again.
6.  Put your mug in the microwave and cook for 3 minutes at 1000 watts. The cake will rise over the top of the mug and look like an erupting volcano, but don't freak out and turn the microwave off.  It's okay!!!
7.  Allow to cool a little, then EAT!   This is best eaten warm.

To make life easier for mom (and a whole lot cleaner!), make several packets of dry ingredients ahead of time.  Young cooks will have a few less items to throw around the kitchen!

NOTES: 
1. Don't forget to get the inside of your cup greasy with cooking spray or butter before you start!
2. Use a full-size cup!

**********************

Here's a way to make a bunch of cake mix packets from boxed cake mix:

1 box cake mix, any flavor
1 box instant pudding mix in a complimentary flavor(3 1/2 ounce )

Place dry cake mix and pudding mix in a large mixing bowl and stir well to blend.
Measure out 1/2 cup portions and place each in a plastic sealable snack bag.

To cook:
1. spray inside of coffee cup with non-stick vegetable spray. 
2. Empty contents of cake mix bag into cup and add one egg, one tablespoon oil and one tablespoon water. 3. Mix well.
4. Microwave on high for 2 minutes at 1000 watts.

************************

Glaze for cakes-in-a-cup:

1/3 cup of powdered sugar
1 1/2 teaspoons of one of the following:  powdered creamer (for vanilla cake, etc.), hot cocoa mix (for chocolate cake), Crystal Light flavor (for fruit flavor cake like orange and lemon), strawberry milk flavor (for strawberry or funfetti cake), etc.

Put the glaze mix into additional snack bags.

While cake is baking, place glaze mix into a small bowl and add 1 1/2 teaspoons water.  Pour glaze over warm cake-in-a-cup and enjoy!


You can also use fudge topping, Carmel topping, marshmallows, or chocolate chips on top of cake before microwaving.

**************************

By the way, cake mix and glaze mix packets tucked into mugs make GREAT gifts and party favors!  Just don't forget to include the directions!!

Tuesday, July 13, 2010

There's hummus among us...

I just love hummus.  It's creamy, slightly tangy, and oh so nourishing.  It's got a perfect mix of high quality fiber and powerful protein.  So cool and yummy served up with pita bread, cucumbers, bell peppers, and celery.  When you throw in the fact that hummus is pretty much a whole food that's super low in bad fat, you just can't ask for more!

Unfortunately, hummus is expensive when you buy it at your deli.  Luckily for my budget, it's so easy to make.  The stuff whips up in a jiffy!

Follow along with me as we make enough for several day's worth of lunches or snacks:

INGREDIENTS:
2 clove garlic
1 (10 oz) can garbanzo beans, drained (save the liquid)
4 Tbsp. lemon juice
1 tsp. salt
black pepper to taste
spices to taste (use what you like:  cumin, or basil, or chili powder, or smoky paprika for example)
2 Tbsp. olive oil
2 Tbsp. tahini (If you can't find it at your store, you can order it here:)


Just a few ingredients here.  See how easy??  You can do this!
(You can see here that I like mine with cumin.)

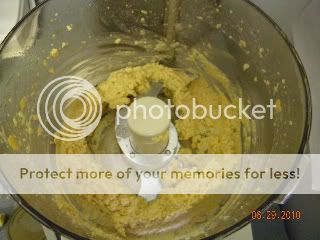
Put the garlic in a blender or food processor and chop.  Put the drained garbanzo beans into the processor, along with the lemon juice, tahini, chopped garlic, and salt.  Whir it up until it's quite mealy in texture. 

Add some of the reserved liquid through the chute and process some more.  The texture should end up like thick peanut butter.  Not too stiff, but not too loose.  Just make it the way that looks best to you!

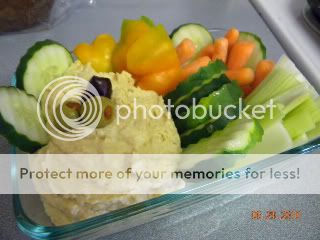
When done, mound your hummus into a dish and drizzle with a good quality organic olive oil.  Pair your hummus with pita bread, olives, and fresh veggies of your choice. 

Thought I'd stop here and show you my old workhorse, the Cuisinart food processor.  I love Cuisinart.  After all, they practically invented the food processessor.  Mine is at least 15 years old and runs like there's no tomorrow.  We use it to chop bushels of hot peppers and tomatoes to make vats of picante sauce, take it to our church picnic to chop buckets and buckets of onions, and also use it for the little everyday stuff. 

I love the Cuisinart!  My kitchen wouldn't be complete without it.  Think I'll go stare at it for a while.  See you in a few...  I'll leave you to look at Cuisinart's current selections.  (Please don't drool on your keyboard!)

I'm back now.  Here's a pic of the final product....


Mmmmmmm......  Healthy Heaven.....

Friday, July 25, 2008

FRUGAL FRIDAY - Looks like Play-Do, but isn't...

This is sooo easy that an 11-year old can do it!! In fact, an 11-year-old did do it! While she only made one color of play dough, it was the coolest blue play dough ever on the face of the planet. This recipe is softer than commercial play dough, smells better, and molds so much better. And you can make it in a jiffy!

Here's the recipe:
1 cup flour
2 teaspoons cream of tartar
1/2 teaspoon salt
1 cup water
1 tablespoon vegetable oil
food coloring

Mix all the ingredients in a 1-1/2 quart saucepan. Using a wooden spoon, cook this over medium-high heat for about 5 minutes or until it forms a ball, stirring constantly.

Turn it out onto a cutting board or roulpat and let it sit for 5 minutes to cool.

Using a bit of flour, knead it until it is no longer sticky, but remains very soft.

Look! You've made play dough!
Now make something cool!

Wednesday, June 18, 2008

MAKE IT FROM SCRATCH blog carnival

The Make it from Scratch blog carnival is originated at Our Red House . I'm new to the blog world, and the idea of going to a carnival while on the computer still hasn't made connections in my little brain. Still, I'm going to try to go to the carnival. My fingers are running over to the party via my keyboard right now!

My contribution to the Make it from Scratch carnival is the Tortilla recipe I promised in an earlier post. We made tortillas tonight with our Mexican Picadillo... Actually, my 11-yo daughter made it. While our mexican flapjacks weren't exactly round, they were totally yummy! Made me want to don my sombrero! Mucho bueno!!

Tortillas
1 Tbsp. baking powder

2 cups flour

1 tsp. salt

1/4 cup shortening

1/2 - 3/4 cup warm water

1. Put the baking powder, flour, and salt in a big gowl. Mix well.

2. Add the shortening to the bowl. Mix with a fork or pastry cutter until it is mixed together. It will be dry and crumbly.

3. Add about 1/2 cups warm water and mix to create a dough. If it is too dry, add a teeny bit of water. If it is too sticky, add a teeny bit of flour. Only adjust with minimal amounts of ingredients at a time.

4. Knead for about 5 minutes. The dough should not be dry, and should almost be slightly sticky. If it absolutely sticks to your fingers, about a tablespoon of flour can be added.

5. Leave the dough in the bowl and cover with a dishtowel or plate. Let it sit for 15 minutes.

6. Make little balls the size of golf balls. Roll them until flat with a wooden rolling pin. You might have to cover your rolling area with a little flour. Don't use too much, though!!

7. Cook the flat tortillas on a hot griddle until they have brown spots on each size.
8. Eat with lots of butter!
My mother frequently made us tortillas when we were growing up. We always felt so lucky! Her tortillas are so soft and just delicioso! Years ago, I asked her to tell me the secret to making such good tortillas and her answer was, "practice." I also asked the lady at our local taco joint, Rock House, what her secret was. Her answer was, "always use the same bowl."
(Actually, I make my tortillas with my Kitchen Aid Mixer, which I love so much that I want to marry it.)
So go pick out your bowl and name it "My Tortilla Bowl." Make your tortillas, then make them again, then make them again, etc., etc. You'll get the fluffiest, yummiest tortillas you've ever had!